部署最新1.28.2-0版本kubernetes kubernetes集群规划
主机名
IP地址
备注
k8s-master1
192.168.2.24
master1
k8s-master2
192.168.2.25
master2
k8s-master3
192.168.2.26
master3
k8s-master-lb
192.168.2.36
keepalived虚拟IP
k8s-node1
192.168.2.27
node1
k8s-node2
192.168.2.28
node2
注:每台虚拟机配置 4G/2处理器/40G
1、基本环境配置 所有节点 修改主机名
修改/etc/hosts
1 2 3 4 5 6 7 192.168.2.24 k8s-master01 192.168.2.25 k8s-master02 192.168.2.26 k8s-master03 192.168.2.36 k8s-master-lb 192.168.2.27 k8s-node1 192.168.2.28 k8s-node2
配置yum源
1 2 3 4 5 6 7 8 9 10 11 12 13 14 15 16 配置阿里云yum源: > [kubernetes] > name=Kubernetes > baseurl=https://mirrors.aliyun.com/kubernetes/yum/repos/kubernetes-el7-x86_64/ > enabled=1 > gpgcheck=0 > repo_gpgcheck=0 > gpgkey=https://mirrors.aliyun.com/kubernetes/yum/doc/yum-key.gpg https://mirrors.aliyun.com/kubernetes/yum/doc/rpm-package-key.gpg > EOF
安装所需的工具
关闭selinux
1 2 3 setenforce 0 sed -i 's#SELINUX=enforcing#SELINUX=disabled#g' /etc/sysconfig/selinux sed -i 's#SELINUX=enforcing#SELINUX=disabled#g' /etc/selinux/config
关闭swap
1 2 swapoff -a && sysctl -w vm.swappiness=0 sed -ri '/^[^#]*swap/s@^@#@' /etc/fstab
安装ntpdate
1 2 rpm -ivh http://mirrors.wlnmp.com/centos/wlnmp-release-centos.noarch.rpm yum install ntpdate -y
同步时间,并加入到计划任务
1 2 */5 * * * * /usr/sbin/ntpdate time2.aliyun.com
配置limit
1 2 3 4 5 6 7 8 9 * soft nofile 65536 * hard nofile 131072 * soft nproc 65535 * hard nproc 655350 * soft memlock unlimited * hard memlock unlimited
升级系统
1 yum update -y --exclude=kernel*
配置master1免密登录其它节点
master1上 git 下来所需的源码文件
1 git clone https://github.com/H-MiKing/kubernetes.git
2、内核配置 centos7所需此操作
所有节点安装ipvsadm
所有节点配置ipvs模块
1 2 3 4 5 modprobe -- ip_vs modprobe -- ip_vs_rr modprobe -- ip_vs_wrr modprobe -- ip_vs_sh modprobe -- nf_conntrack
修改ipvs.conf配置文件
1 2 3 4 5 6 7 8 9 10 11 12 13 14 15 16 17 18 19 20 21 22 23 24 25 26 ip_vs ip_vs_lc ip_vs_wlc ip_vs_rr ip_vs_wrr ip_vs_lblc ip_vs_lblcr ip_vs_dh ip_vs_sh ip_vs_fo ip_vs_nq ip_vs_sed ip_vs_ftp ip_vs_sh nf_conntrack ip_tables ip_set xt_set ipt_set ipt_rpfilter ipt_REJECT ipip
所有节点开启必要的内核参数
1 2 3 4 5 6 7 8 9 10 11 12 13 14 15 16 17 18 19 20 21 22 23 24 25 26 27 28 29 net.ipv4.ip_forward = 1 net.bridge.bridge-nf-call-iptables = 1 net.bridge.bridge-nf-call-ip6tables = 1 fs.may_detach_mounts = 1 net.ipv4.conf.all.route_localnet = 1 vm.overcommit_memory=1 vm.panic_on_oom=0 fs.inotify.max_user_watches=89100 fs.file-max=52706963 fs.nr_open=52706963 net.netfilter.nf_conntrack_max=2310720 net.ipv4.tcp_keepalive_time = 600 net.ipv4.tcp_keepalive_probes = 3 net.ipv4.tcp_keepalive_intvl =15 net.ipv4.tcp_max_tw_buckets = 36000 net.ipv4.tcp_tw_reuse = 1 net.ipv4.tcp_max_orphans = 327680 net.ipv4.tcp_orphan_retries = 3 net.ipv4.tcp_syncookies = 1 net.ipv4.tcp_max_syn_backlog = 16384 net.ipv4.ip_conntrack_max = 65536 net.ipv4.tcp_max_syn_backlog = 16384 net.ipv4.tcp_timestamps = 0 net.core.somaxconn = 16384 EOF
重启服务器
1 2 reboot lsmod | grep --color=auto -e ip_vs -e nf_conntrack
3、高可用组件安装 所有master节点安装HAProxy和Keepalived
所有master节点配置HAProxy,HAProxy配置相同。
1 2 3 4 5 6 7 8 9 10 11 12 13 14 15 16 17 18 19 20 21 22 23 24 25 26 27 28 29 30 31 32 33 34 35 36 37 38 39 40 global maxconn 2000 ulimit-n 16384 log 127.0.0.1 local0 err stats timeout 30s defaults log global mode http option httplog timeout connect 5000 timeout client 50000 timeout server 50000 timeout http-request 15s timeout http-keep-alive 15s frontend monitor-in bind *:33305 mode http option httplog monitor-uri /monitor frontend k8s-master bind 0.0.0.0:16443 bind 127.0.0.1:16443 mode tcp option tcplog tcp-request inspect-delay 5s default_backend k8s-master backend k8s-master mode tcp option tcplog option tcp-check balance roundrobin default-server inter 10s downinter 5s rise 2 fall 2 slowstart 60s maxconn 250 maxqueue 256 weight 100 server k8s-master01 192.168.2.24:6443 check server k8s-master02 192.168.2.25:6443 check server k8s-master03 192.168.2.26:6443 check
所有master节点配置Keepalived,每个master节点配置不一样。
master1
1 2 3 4 5 6 7 8 9 10 11 12 13 14 15 16 17 18 19 20 21 22 23 24 25 26 27 28 29 30 31 32 ! Configuration File for keepalived global_defs { router_id LVS_DEVEL script_user root enable_script_security } vrrp_script chk_apiserver { script "/etc/keepalived/check_apiserver.sh" interval 5 weight -5 fall 2 rise 1 } vrrp_instance VI_1 { state MASTER interface ens33 mcast_src_ip 192.168.2.24 virtual_router_id 51 priority 101 advert_int 2 authentication { auth_type PASS auth_pass K8SHA_KA_AUTH } virtual_ipaddress { 192.168.2.36 } track_script { chk_apiserver } }
master2
1 2 3 4 5 6 7 8 9 10 11 12 13 14 15 16 17 18 19 20 21 22 23 24 25 26 27 28 29 30 31 32 ! Configuration File for keepalived global_defs { router_id LVS_DEVEL script_user root enable_script_security } vrrp_script chk_apiserver { script "/etc/keepalived/check_apiserver.sh" interval 5 weight -5 fall 2 rise 1 } vrrp_instance VI_1 { state BACKUP interface ens33 mcast_src_ip 192.168.2.25 virtual_router_id 51 priority 100 advert_int 2 authentication { auth_type PASS auth_pass K8SHA_KA_AUTH } virtual_ipaddress { 192.168.2.36 } track_script { chk_apiserver } }
master3
1 2 3 4 5 6 7 8 9 10 11 12 13 14 15 16 17 18 19 20 21 22 23 24 25 26 27 28 29 30 31 32 ! Configuration File for keepalived global_defs { router_id LVS_DEVEL script_user root enable_script_security } vrrp_script chk_apiserver { script "/etc/keepalived/check_apiserver.sh" interval 5 weight -5 fall 2 rise 1 } vrrp_instance VI_1 { state BACKUP interface ens33 mcast_src_ip 192.168.2.26 virtual_router_id 51 priority 100 advert_int 2 authentication { auth_type PASS auth_pass K8SHA_KA_AUTH } virtual_ipaddress { 192.168.2.36 } track_script { chk_apiserver } }
所有master节点配置Keepalived健康检查文件
1 2 3 4 5 6 7 8 9 10 11 12 13 14 15 16 17 18 19 20 21 22 23 24 25 26 err=0 for k in $(seq 1 3)do check_code=$(pgrep haproxy) if [[ $check_code == "" ]]; then err=$(expr $err + 1) sleep 1 continue else err=0 break fi done if [[ $err != "0" ]]; then echo "systemctl stop keepalived" /usr/bin/systemctl stop keepalived exit 1 else exit 0 fi
启动haproxy和keepalived
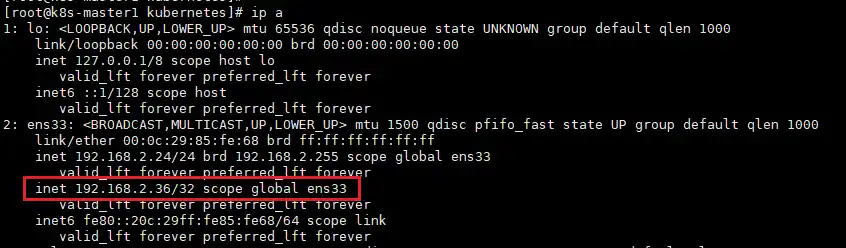
查看master1的ip
4、安装k8s组件 所有节点安装
1 yum install docker-ce-20.10.* docker-ce-cli-20.10.* -y
配置及加载containerd所需的模块
1 2 3 4 5 6 7 8 9 10 11 12 13 14 15 16 17 18 19 overlay br_netfilter EOF net.bridge.bridge-nf-call-iptables = 1 net.ipv4.ip_forward = 1 net.bridge.bridge-nf-call-ip6tables = 1 EOF
所有节点启动containerd
1 2 3 4 5 6 7 8 9 runtime-endpoint: unix:///run/containerd/containerd.sock image-endpoint: unix:///run/containerd/containerd.sock timeout : 10debug: false EOF
所有节点安装1.28.2 kubeadm、kubelet、kubectl
5、集群初始化 master1操作
在所有master节点提前下载好镜像
在master1节点初始化
1 kubeadm init --config kubernetes/install/kubeadm-config --upload-certs
初始化完成后,记录好token值
1 2 3 4 5 6 7 8 9 10 11 12 13 14 15 16 17 18 19 20 21 22 23 24 25 26 27 28 29 30 Your Kubernetes control-plane has initialized successfully! To start using your cluster, you need to run the following as a regular user: mkdir -p $HOME /.kube sudo cp -i /etc/kubernetes/admin.conf $HOME /.kube/config sudo chown $(id -u):$(id -g) $HOME /.kube/config Alternatively, if you are the root user, you can run: export KUBECONFIG=/etc/kubernetes/admin.conf You should now deploy a pod network to the cluster. Run "kubectl apply -f [podnetwork].yaml" with one of the options listed at: https://kubernetes.io/docs/concepts/cluster-administration/addons/ You can now join any number of the control-plane node running the following command on each as root: kubeadm join 192.168.2.36:16443 --token 7t2weq.bjbawausm0jaxury \ --discovery-token-ca-cert-hash sha256:4a1a076d7184481e335d85b95855bee7b66c0e73fcf31d6b8e3095b12ac3fde9 \ --control-plane --certificate-key 9ca8520c0ed2b1372ccedf6903fc5d94acce274a59d1dc37e54af7a6c014aa3a Please note that the certificate-key gives access to cluster sensitive data, keep it secret! As a safeguard, uploaded-certs will be deleted in two hours; If necessary, you can use "kubeadm init phase upload-certs --upload-certs" to reload certs afterward.Then you can join any number of worker nodes by running the following on each as root: kubeadm join 192.168.2.36:16443 --token 7t2weq.bjbawausm0jaxury \ --discovery-token-ca-cert-hash sha256:4a1a076d7184481e335d85b95855bee7b66c0e73fcf31d6b8e3095b12ac3fde9
master1配置环境变量
1 2 3 4 cat <<EOF >> /root/.bashrc export KUBECONFIG=/etc/kubernetes/admin.conf EOF source /root/.bashrc
其它master节点加入集群(根据刚刚初始化生成的token值里面的信息,有contol-plane的是master节点加入的命令)
1 2 3 kubeadm join 192.168.2.36:16443 --token 7t2weq.bjbawausm0jaxury \ --discovery-token-ca-cert-hash sha256:4a1a076d7184481e335d85b95855bee7b66c0e73fcf31d6b8e3095b12ac3fde9 \ --control-plane --certificate-key 9ca8520c0ed2b1372ccedf6903fc5d94acce274a59d1dc37e54af7a6c014aa3a
node节点加入集群(根据刚刚初始化生成的token值里面的信息)
1 2 kubeadm join 192.168.2.36:16443 --token 7t2weq.bjbawausm0jaxury \ --discovery-token-ca-cert-hash sha256:4a1a076d7184481e335d85b95855bee7b66c0e73fcf31d6b8e3095b12ac3fde9
查看集群状态
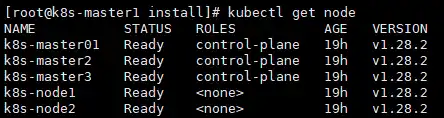
1 2 3 4 5 6 7 8 [root@k8s-master1 install] NAME STATUS ROLES AGE VERSION k8s-master01 Ready control-plane 19h v1.28.2 k8s-master2 Ready control-plane 19h v1.28.2 k8s-master3 Ready control-plane 19h v1.28.2 k8s-node1 Ready <none> 19h v1.28.2 k8s-node2 Ready <none> 19h v1.28.2
6、其它组件安装 calico组件安装
master1操作
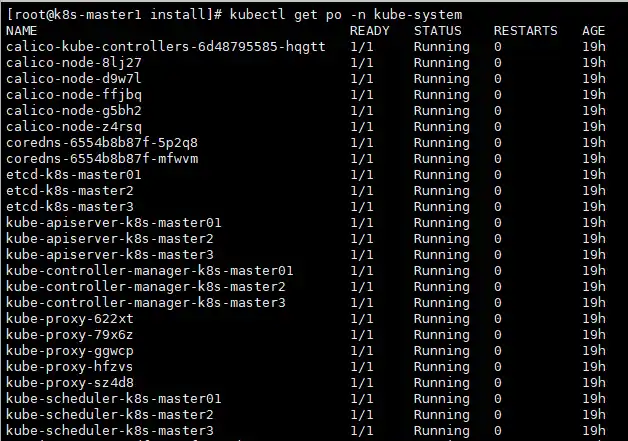
查看pod状态
查看node状态,全部为ready
部署metrics
master1操作
查看pod状态
1 2 3 NAME READY STATUS RESTARTS AGE metrics-server-8df99c47f-4srth 1/1 Running 0 19h
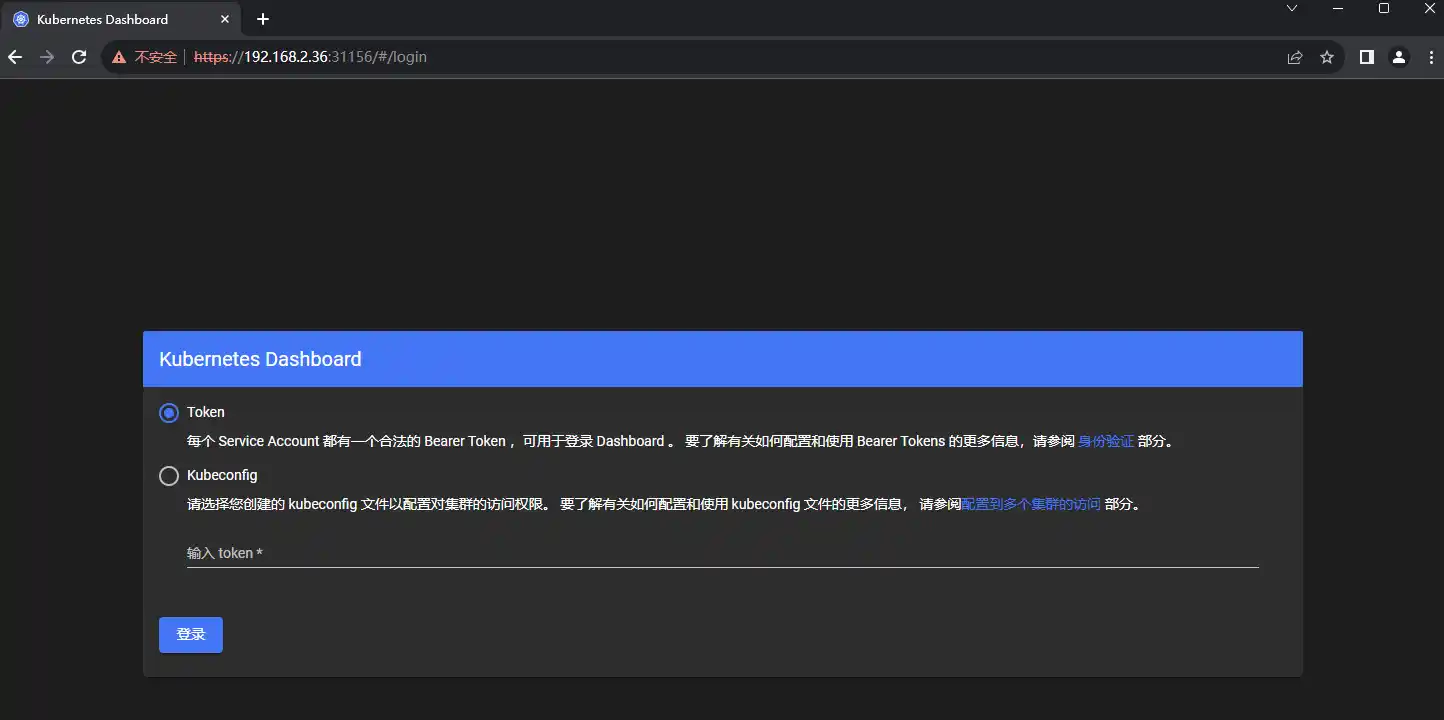
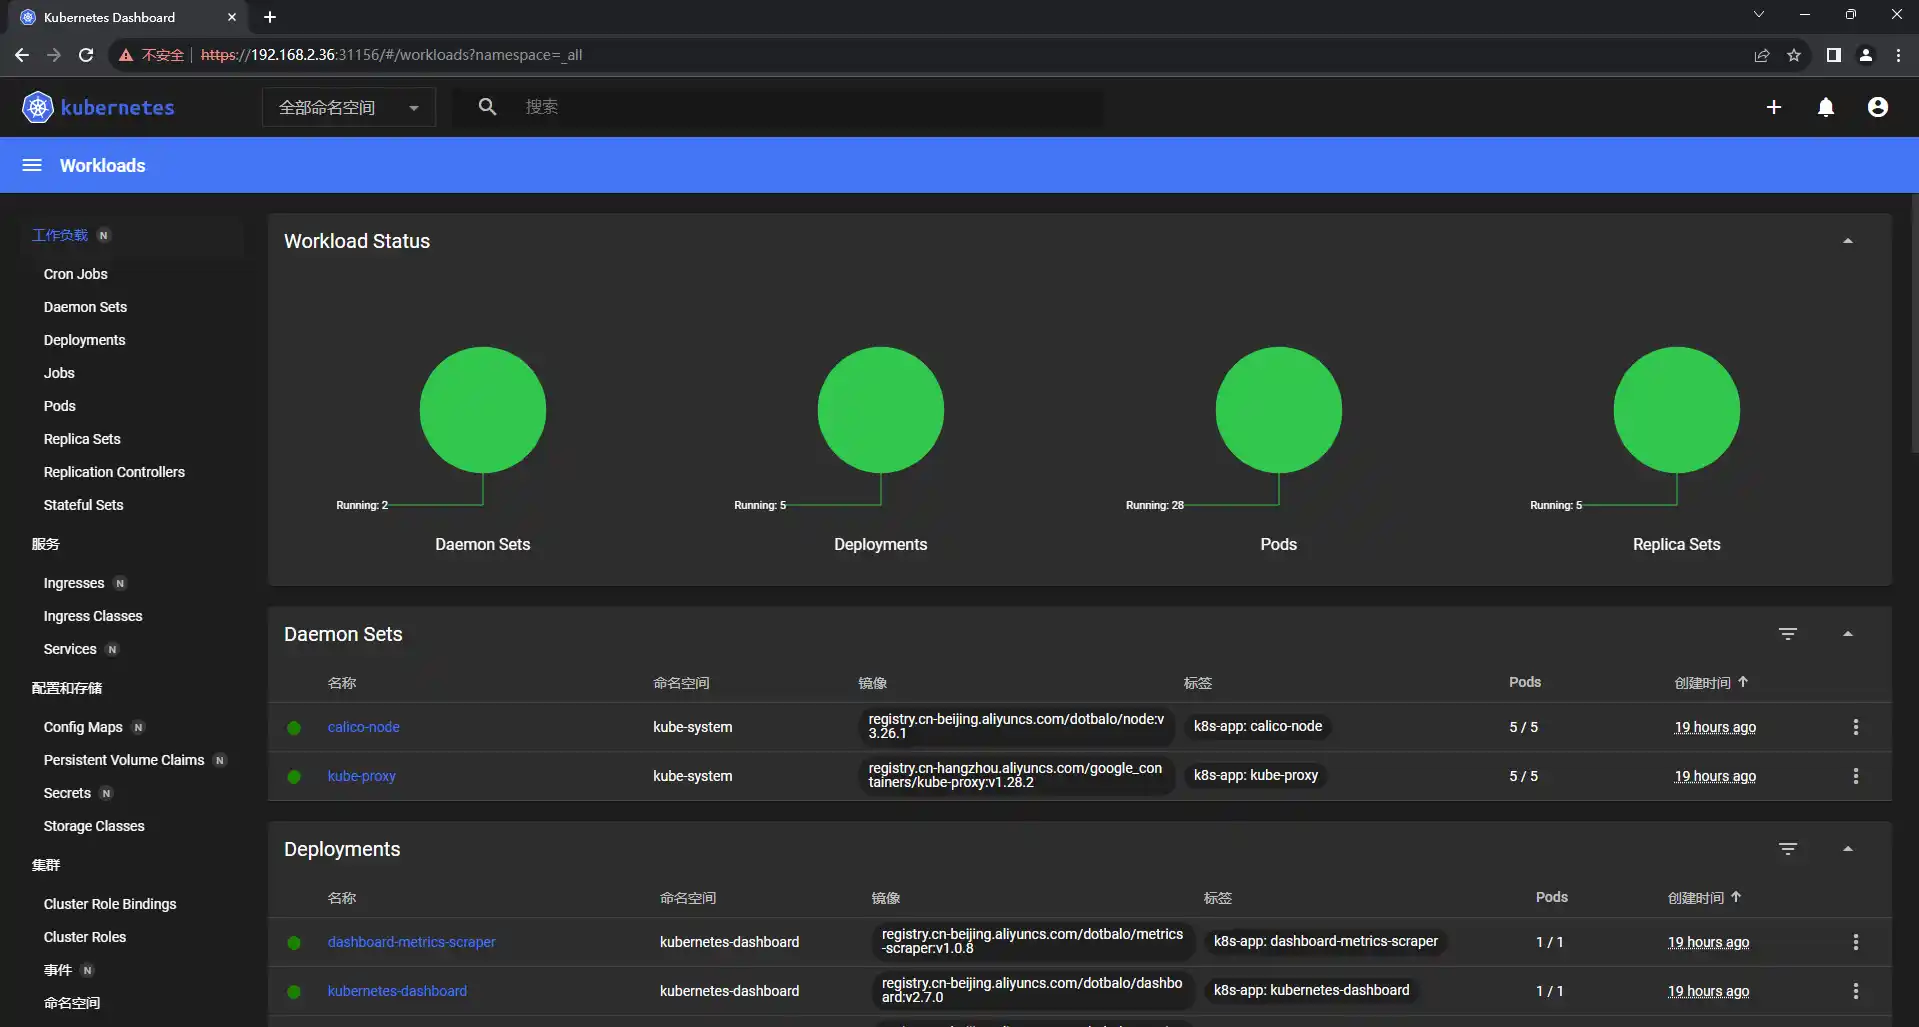
部署Dashboard
master1操作
查看dashboard的端口号
1 2 3 4 [root@k8s-master1 ~] NAME TYPE CLUSTER-IP EXTERNAL-IP PORT(S) AGE kubernetes-dashboard NodePort 10.96.188.244 <none> 443:31156/TCP 19h
通过node的ip加端口实现访问
例如192.168.2.36:31156
创建登录token
1 2 3 eyJhbGciOiJSUzI1NiIsImtpZCI6InpXaXRGbmt5VTdVMlhoUlIxOS13Zk54MUszbmJKZUhnQ3hwUWllUnYtVEkifQ.eyJhdWQiOlsiaHR0cHM6Ly9rdWJlcm5ldGVzLmRlZmF1bHQuc3ZjLmNsdXN0ZXIubG9jYWwiXSwiZXhwIjoxNjk3Nzc2MjEwLCJpYXQiOjE2OTc3NzI2MTAsImlzcyI6Imh0dHBzOi8va3ViZXJuZXRlcy5kZWZhdWx0LnN2Yy5jbHVzdGVyLmxvY2FsIiwia3ViZXJuZXRlcy5pbyI6eyJuYW1lc3BhY2UiOiJrdWJlLXN5c3RlbSIsInNlcnZpY2VhY2NvdW50Ijp7Im5hbWUiOiJhZG1pbi11c2VyIiwidWlkIjoiZTViMTJiZGQtNGUwNy00MTkxLTliMWYtZTdjZjBlMGU3ZDY4In19LCJuYmYiOjE2OTc3NzI2MTAsInN1YiI6InN5c3RlbTpzZXJ2aWNlYWNjb3VudDprdWJlLXN5c3RlbTphZG1pbi11c2VyIn0.Ik9aZm3SJsmGGSyKEHfDo2HzOwyQCmSFPcRV19OKE5BY8E9UPmFNxGhnAlub1Tn0SB3e4ngCILsUi_JAs5N8Iw5zfwJUlhcr5E4rYzZjvT_nYgYhxTrtLYB4FjRnhE_0oWCdzkNARpG8Eu-75RIe2grC4eh2W6PhAvj3-FmoOhZsbTcgd5SsCH4AWiQyCiNtaSovVW70lDKNYK3kQ-y3SIfxd0g-m0PV5k9iguV3iXJ7CCsC6Nk0Y7X7fuyJ5D-dY0vqyZRtl-4JDty3NZhhx_1iAA9cH8e-LIoz3kre98aypD3LauqhZDfCihHFaFC5Nufkuc8u9WG15FvF4GSxRg
笔记整理:H-MiKing